 Gmail is one of the most important email services, and it is highly reliable. It provides multiple features that are beneficial, convenient, and make the entire experience much more comfortable. It not only offers primary emailing functions like sending, receiving, forwarding, or replying to emails, but it provides premium features like intelligent replies or suggestions, automatic segregation of emails into their respective categories, and more. This email service is significantly essential for people who exchange emails regularly due to the nature of their profession, which is why a temporary error itself can cause problems for such individuals. One of the most common errors that users face while using Gmail is the Gmail Error 500. You will find the solutions for this issue in this blog.
WHAT IS GMAIL TEMPORARY ERROR 500? Gmail, like most other email services, is a web-based email service. It required servers to function and deliver the functions to its users. The server requires configuration with the software or program. However, when there is a conflict in the server configuration with Gmail, the Gmail temporary error occurs and displays as ‘Sorry, but Gmail is temporarily unavailable on the screen. Encountering errors like this one can be pretty inconvenient for the users, but resolving them may not be as difficult as you would imagine. SOLUTIONS TO FIX GMAIL TEMPORARY ERROR 500 As mentioned earlier, it can be easy to resolve this problem. We have collected the steps to fix Gmail error 500. CLEAR CACHE The first solution is to clear the cache of your browser. The cache is the temporary data files that help websites load faster, but deleting them will not affect your current stored data. You can press Control, Shift, and Delete buttons together to clear the cache. REMOVE PLUGINS At times, running multiple plugins and antivirus programs to protect information may cause conflicts. You can temporarily remove the plugins and antivirus programs to see if the Gmail temporary error resolves itself. UPDATE YOUR BROWSER The third solution is to update your browser to the latest version as most problems occur because your browser is outdated. CHECK CONFIGURATION The fourth solution to fix Gmail error 500 is to review Gmail server settings and ensure that they are set correctly. You may need to make changes in the settings to fix this problem. DELETE EXTENSIONS The fifth solution is to disable additional extensions from your system as they may be causing the conflict in the first place. If these aren’t the reason for this problem, you can re-enable them to fix this issue. This blog will explain what Gmail temporary error 500 indicates and the steps to fix this issue. The solutions include deleting cache, removing plugins, disabling the Firewall and the Antivirus Internet security, and correct configuration of the Gmail server. Please check out our other blogs for more information.
0 Comments
 Two-factor authentication is an extra layer of security with your credentials to verify you as the account’s owner. This security measure’s primary motive is to protect the account from intruders or hackers and keep it secure. Gmail two-factor authentication requires an additional security key after your enter your credentials to let you through to your account. First, you enter your login details, i.e., your email address and password, then you enter the security code Gmail sent you to your associated mobile number, and if it verifies, Gmail lets you into your account. In unfortunate scenarios like where you lose your phone, and you cannot log in to Gmail, you can bypass the security as there are a few ways to Gmail 2-step verification bypass.
WAYS TO BYPASS GMAIL TWO-FACTOR AUTHENTICATION There are two ways mentioned here to bypass two-factor authentication. Please follow the steps mentioned below for each solution. PASSWORD RESET The first solution is to reset your password. In this process, you can reset your password and get a password-reset link on your alternate email address instead of your phone number. So, follow the steps mentioned below to bypass Gmail two-factor authentication:
Now that you know how to bypass Gmail’s measure by resetting your password. OAUTH MECHANISM The second solution is to use the OAuth Mechanism, which means logging into your account using a third-party login. Many a time, you can sign in to your account through Google or Facebook – that is called a third-party login. So, you can do a Gmail two-step verification bypass using OAuth Mechanism by following the steps mentioned below.
There are more ways to bypass this security measure. However, those mentioned above are the most convenient. Nevertheless, I do recommend switching your phone number so you do not have to bypass this security measure each time you log in from an unrecognized device.  Outlook rules not working is the common problem that one can face while using Outlook. There are numerous reasons why your Outlook is not working. This can also happen if you have set all rules accurately; you can fix the problem both automatically and manually. According to the depending situation, both the methods work perfectly fine.
Outlook Rules Not Working Mac The reason why Outlook rules not working Mac is because rules run automatically on messages. You can fix this problem simply by applying manual rules to the messages that you have received already. To set the manual rules, follow the steps:
How to Fix The Issue Of Outlook Rules Not Working in Office 365? Are you having a hard time with Outlook 365 rules not working, don’t worry, as there are several ways to fix the issue!! Here are some of the solutions to resolve Outlook rules not working.
Winding Up These are some of the quick fixes you can use when Outlook rules are not working on Mac or Office 365. These fixes will surely help to resolve the issue. Outlook rules not working are not such a significant issue; they can be resolved with a bit of information about it.  Facebook is a social media network widely known for its interesting feature and huge user base. It offers features like Facebook polls, Events, Groups, Games, Share (Photos and Videos), Live Chat, and many more. It is not only great for a personal account but also significantly beneficial for professional purposes like boosting your business by reaching out to thousands of people without having to move an inch – as all is done virtually. Upon Facebook’s launch, it has taken the entire social media network by storm by creating a magnitude in the industry. It is an excellent way to reach out to people by creating a page on Facebook. But what would you do if you wished to change the name on your Facebook page? We have curated this blog to teach you how to rename Facebook page name, and while we are at it, you will also find how to change the name on your personal profile.
STEPS TO RENAME FACEBOOK PAGE CHANGE The first thing to ensure is that you are the admin of the Page that you are trying to rename. If you aren’t the admin, kindly ask the present admin to share his/her admin rights with you so you can do the needful. Now, we must move on to the process.
STEPS TO CHANGE NAME ON FACEBOOK If you do not own a page on Facebook but wish to change your profile name, this segment is for you. To know how to change my name on Facebook, kindly follow the steps mentioned below.
This is how to change my name on Facebook. Please follow all steps to make necessary changes in both the Facebook page and Facebook profile name. You can find more information in our other blogs if you need additional assistance.  Microsoft Outlook plays a vital role in everyday professional requirements; it simplifies the entire emailing experience while also managing personal information. It is a part of the Microsoft Office suite and offers features like task managing, calendaring, contact managing, note-taking, web browsing, and more. Outlook is accessible on Windows, macOS, iOS, and Android, contributing to this email service's extensive usage. The fact that it is available on your smartphone makes it even easier to use as everything becomes handier. In today's digital time, we are pretty dependent on technology, so each time our websites, applications, or device stops working, we spiral into panic. Similarly, when you experience Outlook live not working, you are baffled. We have curated this blog for you to resolve the issue at hand and get Outlook back to work.
SOLUTIONS TO OUTLOOK NOT WORKING There may be different reasons for Outlook not working, which we may not be aware of. So, we will discuss four solutions to try all and see which one does the trick. Please refer to the solutions mentioned below. INTERNET CONNECTION
WORK OFFLINE
UPDATE ALERTS
CHECK OUTLOOK SETTINGS
Using the solutions mentioned above, you can fix the problem at hand quite effectively. For more assistance, please check our other blogs. We provide the best solutions to your IT-related issues, kindly check.  Many times, people face AOL mail not receiving emails due to the several reasons. Here, we are going to give you some tricks to fix the problem.
1. Whenever you are unable to receive the new emails into your computer. You should log into your AOL mail account and go to the settings and click on filter settings. Now check the account settings, if you find any filter. you need to click on delete. After deleting the settings, you should send a mail to yourself. Let’s see if you are receiving it now or not. 2. If you do not find any filters into your emails, you should check the block list settings, may be you have blocked the new emails from senders. That’s why you are not receiving any new emails. so you should immediately go ahead and check it. 3. If you are unable to receive the new emails into your phone or computer. I would like to suggest you to check the server settings. Most of the time, people are facing such kind of problem due to the incorrect server settings. So you should check them properly and if you find something wrong over there. You need to remove the account from your computer or phone and then reconfigure it. It will start working fine. So these are some basic solution to fix AOL mail not receiving emails problem. if you are also facing any other problems with your AOL account. let me know, I will go ahead and give you some advance tricks to fix it. For more details you may visit: AOL Mail not Working on Android Original Source: https://markjohnson9654.medium.com/can-you-tell-me-the-reason-behind-aol-mail-not-receiving-emails-issue-87387f84c2a8  Facebook is a proactive social media network that develops and adds beneficial features to generate more audience and make the users more comfortable with the network. It’s no secret that Facebook has the largest user base as compared with its competitors, but the reason for the same may be unclear. As a user myself, I believe that Facebook understands its customers’ needs and modifies the features accordingly. For instance, Facebook is extremely social software, but many users may not be comfortable being that social with unknown users on their personal Facebook, so to overcome this issue, Facebook allows you to adjust your account’s privacy as you wish to. Users can choose whether (or not) they share their personal information with strangers online. We will discuss how to make your Facebook page private in this account.
STEPS TO MAKE YOUR FACEBOOK PRIVATE One solution to your question, How do I make my Facebook private? is changing your default settings, so all posts you make moving forward are automatically set to be private. To make these necessary changes in your privacy settings, follow the instructions mentioned below.
STEPS TO MAKE YOUR FACEBOOK FRIENDS LIST PRIVATE If you wish to know how to make your Facebook page private – Friends list, follow the steps below.
The aforementioned steps must answer your question, How do I make my Facebook private? You can follow these steps to tweak the privacy settings of Facebook. You can find additional information in our other blogs.  Microsoft developed a free email service named Outlook. It is built for personal or professional email use and managing various activities on one platform like calendaring, task managing, contact managing, note-taking, journal logging, and web browsing. The outlook is a famous product and is widely used worldwide for its efficient features. Many a time, users face errors associated with Outlook features that they may find difficult to resolve. However, these errors are easily solvable once you know why the error occurred and how to fix it. This blog will provide you just that. This blog will lay out the reason for Outlook error 0x80004005 and how to fix it.
Outlook error 0x80004005 on Windows 10 occurs due to the following possible reasons:
FIXES FOR OUTLOOK ERROR Following are the fixes for this error. Try each solution to see what works for your system. If one doesn’t work, try the next.
The aforementioned are the solutions for your problem. All should serve to fix the given error. Please find more information in our other blogs. Related Articles: Outlook Stuck on Loading Profile Outlook Search Not Working Outlook not responding when deleting emails Outlook Integration Error Outlook Won’t Open Outlook Send Receive Error 0x800ccc0e Outlook Mac Error 3253 Troubleshooting Outlook Issues  Bellsouth is one of the most popular email services used by billions of users worldwide. Bellsouth is very popular with users for its highly secured mailing features, and users can access it from a variety of devices. It offers an easy interface for sending and receiving emails. But sometimes many users have a lot of technical problems when using Bellsouth email.
If your Bellsouth email not working, then do not worry, you just need to contact the Bellsouth Email customer service they will help you with your queries. The user can add this ID to their Smartphone as well as client applications. Bellsouth email users can add their iPhone account with a few tweaks. Many times people report account-related issues such as email. The email does not send or receive attachments. For the troubleshooting steps listed below. Bellsouth Email does not work on iPhone If Bellsouth Email does not work on your iPhone, you do not need to worry. What you need to do is go through the steps below. Method 1:
What are the reasons for the Bellsouth Email iPhone not working? Bellsouth Email may be malfunctioning due to a major technical glitch. And until you find the cause, you will not be able to fix the problem. Click below for details.
When was the last time you cleaned cookies and updated your email account? If a long time has passed, you need to take steps now to avoid any inconvenience. The same is true for users who use Bellsouth too. And if you’re also a Bellsouth e-mail user using this e-mail on your Mac, then you may see some different features on your laptop. And later, if you have problems with Bellsouth email, and you find that Bellsouth email. Mail does not work, it can be for many reasons. And to fix the problem, let’s first find out the reasons that cause the problem, then find the ways. Reasons Bellsouth Email Not Working on Mac
Users can now sign in to their Bellsouth account with an iPhone. If there is still a problem, the user should contact Bellsouth Email Customer Support. The most effective technical support for adding or deleting accounts on iPhone is available with just one call. The nurses are certified experienced and they provide sufficient technical support 24/7. SOURCE: https://medium.com/@kontactforhelp24/fix-bellsouth-email-not-working-on-iphone-979d1b68c681  Gmail is one of those services that you don’t really think about until it’s gone. Is Gmail not working for you today? When it hits the fan, you need to get it fixed, but how? We’re here to help, as we break down the five most common Gmail issues and how to fix them. Gmail not working? Check Google Status Dashboard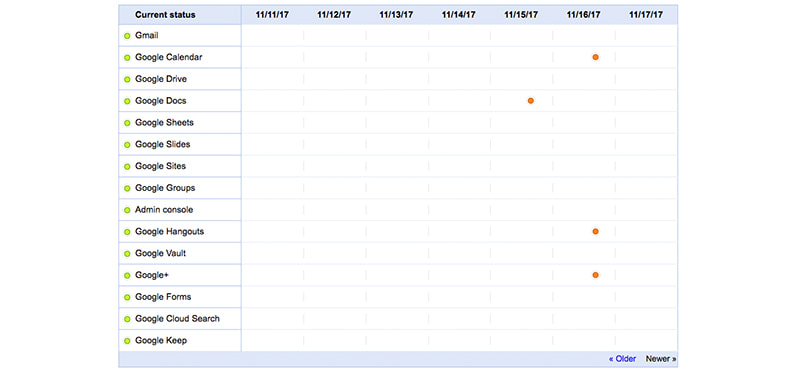 Is Gmail not working for you? First of all, click this link, then bookmark it, then tattoo it onto your left bicep, just in case. This is the link to Google’s app status Dashboard. If there is ever an outage, suspected outage, or credible report of an outage of any Google service — so anytime Gmail’s not working — this site will let you know. On the page, you’ll see a list of all the apps in Google Suite, and a list of dates leading up to the current date. Orange dots indicate there is or was trouble. You can go back about two months to see old outages too, if need be. Otherwise, if you’re having trouble with any Google app, this should be your first stop — after this article, that is. Nuclear option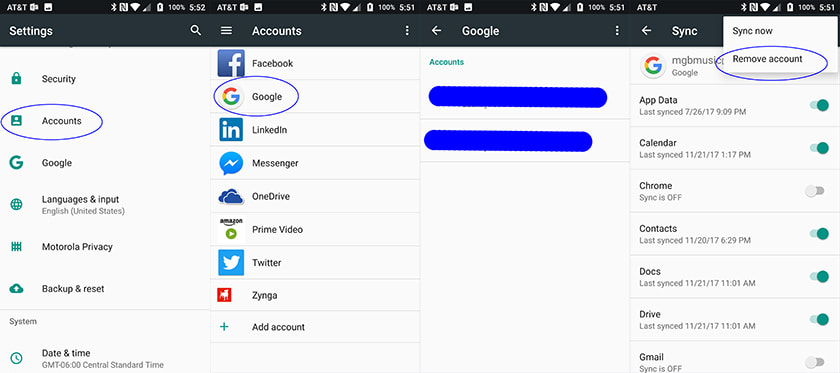 This is a little tongue in cheek, but often when you’re having trouble with your Google account, removing the account from your mobile device and setting it back up again will resolve a lot of problems. The beauty of a Google account is that everything is stored in Google’s servers — your mail, your documents, your movies and videos, etc. All of those will come back, once you reset up your account. It is a nuclear option of sorts, but it’s also the easiest way to wipe everything and bring it all back. It’s nuclear, but simple. To do so, go to Settings > Accounts, select your Google account, tap on the three vertical dots at the top right corner and tap on Remove. Keep in mind that the process may be slightly different depending on your device and Android version. Forgot password One of the most common reasons someone loses access to their Gmail account is because they have forgotten their password. Not everyone can use the passphrase “MargaretThatcheris100%sexy,” so we get it. Fortunately, Google has a number of tools you can use to recover that password. Fair warning — it’s not a lot of fun. Have you ever noticed that any time you forget your password on another service, like Netflix, the recovery option is almost always to have it emailed to you? Well, that won’t work if you’re trying to log into an email account. First, it’s critical that you set up alternative contact methods attached to your Google account. Log in to your Gmail account, click your profile pic in the upper right corner, and then select “Manage your Google account.” Tap the “Security” tab and locate the “Ways we can verify it’s you” option. Next, make sure the two options — Recovery Email and Recovery Phone — are filled out. These are the recovery methods you can use to get access to your account back. 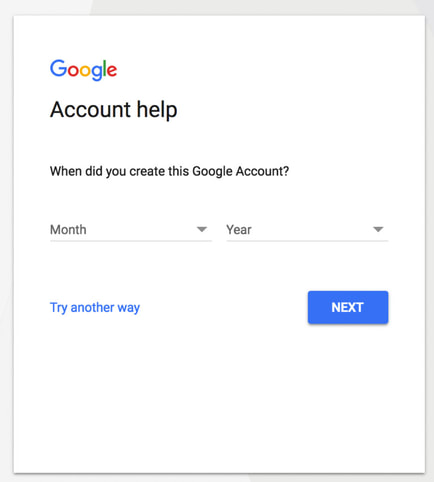 Two-step verification issues 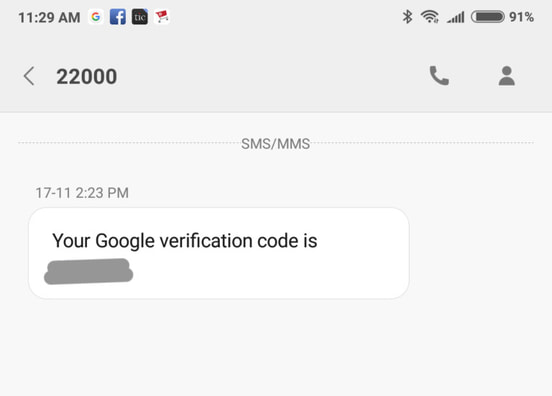 Two-step verification is one of the best methods you can use to secure your account. Briefly, two-step verification adds a second layer to your security by requiring a second acknowledgment of a login attempt. For example, if you log into your Gmail account, you’ll receive a text message with a code you must enter in order to proceed. But things don’t always go smoothly. Sometimes, the code doesn’t get there. What then? First, you need to make sure you’re in an area with good signal. Google sends 2-step authentication codes via SMS, so if you’re in an area with strong Wi-Fi but not good cell signal — I’m looking at you, downtown Chicago — that could be part of the problem.  If so, you can use the Google Authenticator app. Simply download the app on your phone. Once installed, you’ll be asked how to verify the account. The easiest is with a QR code. On your computer, go to the two-step authentication page, and scroll down to Authenticator App. Click on that and follow the steps to scan the QR code. Once scanned, you’ll get a code in the app. Enter that code into the “Verify” box on your computer, and it will link the phone to your account. From then on, you’ll use the Authenticator app to log in, rather than SMS codes. If that won’t work, you can also opt to receive a call on your backup phone. Of course, this will still not work if you’re in an area with a bad signal. However, you can choose for this to be a landline. The downside to that choice is that you have to be at the place where the landline is, but it is an option. Finally, if all else fails, you can also use backup codes. Backup codes are generally used for occasions when you lose your phone, or cannot receive authentication codes by any other means. 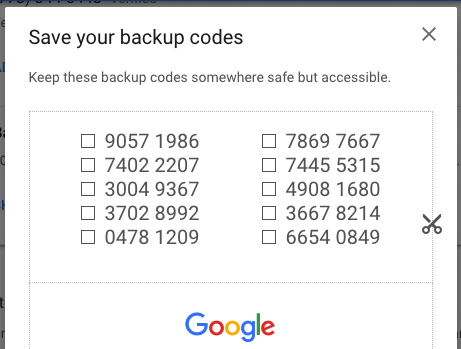 These need to be generated in advance. Backup codes are sets of codes you can use to log into your account in lieu of your two-step verification. Backup codes come in sets of 10. These are one-time use codes — they become inactive as soon as you use them. If you generate a set of codes, all unused codes from your last batch are deactivated. Spoiler alert: I generated a new set of codes after taking that screenshot. To generate a set of codes, visit the two-step verification page and scroll down to the backup codes area. Click on “Get new codes.” This will generate a text file for you to download, which will be called “Backup-codes-<yourusername>.txt. If you want to use the backup code to sign in, go to the Gmail sign-in page and enter your username/password. When asked for the two-step authentication, click “More options” and then click “Enter one of your 8-digit backup codes.” Enter your code, and you’re good to go! Sync issues 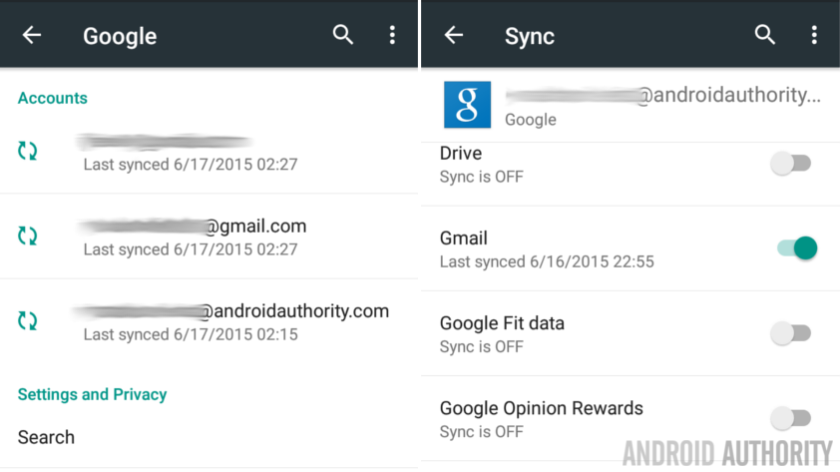 Gmail can fail to sync for a lot of different reasons, and a failure to sync can manifest itself in a number of ways. You may not have all of your messages, you may be failing to send email, you may receive an “account not synced” error message, or the app itself may just be slow. In any of these cases, you can try several steps to get things back up and running. 1. Update the Gmail app. Sometimes an older, outdated version of the app can have trouble getting mail from Google. Making sure you have the latest and greatest version of the Gmail app will resolve a lot of sync issues. 2. Restart your device. Have you tried turning it off and on again? Yes, it’s a cliché, but it works a surprising number of times. 3. Verify your connectivity. Yes, it’s a stupid question, but we have to ask. You can avoid a lot of unnecessary troubleshooting if you make sure you have a good signal, aren’t in Airplane mode, etc. 4. Check your Gmail settings. Should you have to make sure sync is on? No. But you do. Accidental taps happen, and if Gmail sync gets turned off, nothing gets synced. Open the Gmail app, and tap the menu button in the upper left corner -> Settings. Tap on your account and make sure you’ve checked “Sync Gmail.” 5. Clear your Gmail app data. Open your device’s Settings app -> Apps & Notifications -> App Info -> Gmail -> Storage -> Clear Data -> Ok. Once you’re done with that, restart your device and see if that did the trick. Most of the time that will work. Missing messages If your Gmail is missing emails that you know are in there, the most likely cause is that you accidentally deleted or archived them. You can check this easily enough by clicking on the Trash folder in Gmail. Most often you can find the trash folder by clicking “More” in the folders area, then clicking “Trash.” If the email is in there, it may be archived. In the area where you clicked “More,” look for “All Mail.” That will show you all mail, whether archived or not. You can also search for mail by typing in the search box. In the “All Mail” folder, search for archived email, but remember that it won’t search the Trash folder. Most of the time, your email will be in the trash or archived — I’m no stranger to that myself. If you find the email in either place, click on it to open it, then click the folder icon at the top, then choose “Move to Inbox.” That will restore the email to your inbox and you’ll be able to see it normally. Bonus! Gmail won’t load (browser only)  If you’re logging into Gmail with a web browser, and the web page will not load for you, there are a few things you need to try to get things back up and running again. First, you’ll want to make sure you’re using a supported web browser. You can find a list of supported web browsers in Google’s help site. It’s fair to say that most modern web browsers will work, but Opera users will be out of luck, I’m afraid. Often, browser extensions or applications can interfere with Gmail as well. A quick way to check on this is by trying out Gmail in the web browser’s private or incognito mode. If Gmail works there, try disabling browser extensions one-by-one until you find the culprit. Sometimes cookies or temporary files can break Gmail as well. The same test — using incognito mode — is a quick way to test that behavior as well. If Gmail works in incognito mode, but disabling extensions didn’t help, clearing your cache and cookies should do the trick. Finally, you might want to try disabling any Google labs you have running. The easiest way to do that is to visit this website. This will automatically disable any labs you have running so you can test the Gmail client without them. If it works, again, try disabling all labs, and re-enabling them one at a time. If Gmail fails again, you have your culprit. Anything else? Gmail is one of those services that usually just works, and it’s wonderful. It is an awful feeling when it goes down. Hopefully, some of these tips have helped get you back on track. If there’s anything you’ve run into that you can’t figure out, let us know. Of course, if there’s something we haven’t covered that you’d like to see, hit us up in the comments. If you have any other tips, feel free to drop us a note in the comments, and we’ll be sure to update the article in the future.
Source: https://www.androidauthority.com/gmail-not-working-common-issues-816785 |
Author'Alice Cook' is been working for the last 5 years as the strategists and senior digital leader with a core skill set in digital marketing, digital transformation. Work at Contactforhelp. Archives
June 2021
Categories
All
|
 RSS Feed
