 Fallout 3 is an action role-play open-world game and released to the planet on multiple platforms in 2008. one of the foremost successful games of its time and its genre, Fallout 3, was why thousands of gamers started idolizing the Fallout franchise. Proof of Fallout 3’s immense popularity and success is that gamers still play today. The fact of the matter is that it had been designed to run on old, clunky computers. The game isn't compatible with both the computers and the Operating Systems of today, but where there's a will, there is a way. People have found ways to run and play Fallout 3 even on Windows 10, and if you're also wondering how to get fallout 3 to work on Windows 10, then follow the below steps.
Step of How to Get Fallout 3 to Work on Windows 10 If you’re having issues running and playing Fallout 3 on Windows 10, the following are a number of the foremost effective solutions you'll use to resolve the problem you're facing:
Those are some of the more likely resolutions which will kick-start Fallout 3 so you'll be able to play the game in Windows 10. I hope this blog on how to play Fallout 3 on windows 10 has helped you.
0 Comments
 This article explains how to check the Google Status Dashboard to determine if Gmail is down, plus how to access the Gmail Help Center for solutions to frequently occurring issues. These instructions apply to the desktop version of Gmail.com.
Check the Google Workspace Status Dashboard If you have trouble with your Gmail account, the service may be disrupted or down completely. However, it could be just you. Before you take any other action, check the current status of Gmail. Person checking Gmail status on a computer Miguel Co / Contactforhelp Go to the Google Workspace Status Dashboard. Go to the listing for Gmail and look at the Current status column. A green button next to Gmail indicates there are no known issues, an orange button indicates a service disruption, and a red button indicates a service outage. Go to the current date for Gmail to read comments. If the button is green, you are the only one having a problem and should contact Gmail support for help. If the button is orange or red, Google knows about it, and there's nothing to do until Google resolves the problem. Usually, when the button is red or orange, there's an indication of what is going on or when it might be fixed. Screenshot of outage dot on Google's G Suite Status Dashboard Subscribe to the Status Dashboard RSS feed in an RSS feed reader to receive up-to-date status reports. Go to the Gmail Help Center Before you contact Google for help, look at the Gmail Help Center to see solutions to frequently occurring problems with Gmail. A screenshot of the Gmail Help Center. Select Fix a problem and choose the category that matches the trouble you are having. Categories include: Gmail messages are missing Unwanted or suspicious emails Loading & display Account Can't sign in to Google account Sync & import Rejected messages Switching to Gmail from Microsoft Outlook You may find a solution at the Help Center. If not, contact Google. How to Report an Issue to Google If you encounter a problem that's not on the Gmail not working Help Center list, report it to Google. In Gmail, select Support (question mark). In Gmail, select Support (question mark). Select Send Feedback. Select Send Feedback from the Support list In the Send feedback window, describe your issue. Include a screenshot of the problem, if you have one, then select Send. Note: Send Feedback window in Gmail with Send highlighted Use the provided tools to hide and highlight things in your screenshot. A technician will respond and assist you with the problem. Note: If your Gmail is part of a paid G Suite account, you have additional service options that include phone, chat, and email support. Read more Gmail problems:-  Facebook is the most prominent free social media platform with a plethora of convenient and exciting features. It is accessible across all platforms and operating systems. Users can enjoy every feature on devices like iPhone, Android, Laptops, and Desktops. With over two billion active users, it has become the largest social media platform amongst others. Facebook provides a secure and user-friendly solution and enables its users to share photographs, text, videos, and links with their friends, family, colleagues, and acquaintances. Facebook even allows you to create pages representing a community or a brand and profiles as per your preference – including the things you like, basic details, personal information, and more. It even lets you change or modify your pages conveniently. You will find how to make a poll on Facebook in this blog.
STEPS TO CREATE A FACEBOOK POLL ON STORY The Facebook poll is an excellent feature that helps you gain specific insight into your customers’ or friends’ opinions. To know how to make a poll on Facebook, please follow the steps mentioned below: ● Firstly, open your Facebook mobile application on your Smartphone and log into your account, if required. ● Select ‘Add to Story’ from the top of your news feed to open the story screen, where you will need to add a picture or a video as the background of your poll. ● On the top-right of your screen, select ‘Poll.’ ● Tap on the text box to insert your question along with the desired choices ● Once satisfied with the question and the alternatives, tap on ‘Share to Story.’ STEPS TO CREATE A FACEBOOK POLL ON GROUP If you want to create poll on Facebook group, follow the steps below: ● Open the Facebook mobile application on your Smartphone and tap on ‘Groups’ to select the desired group you wish to share the poll with. ● Tap on the text box; you will see the ‘Add to your post’ option and three dots next to it – tap on it and select ‘Polls’ from the options. ● Type your question next with the two alternatives, and tap on ‘Post’ to publish the poll. If you wondered how to make a poll on Facebook, following the mentioned steps successfully should have achieved you the same. If you need more information, please feel free to visit our other blogs, where you can find relevant details on Facebook. 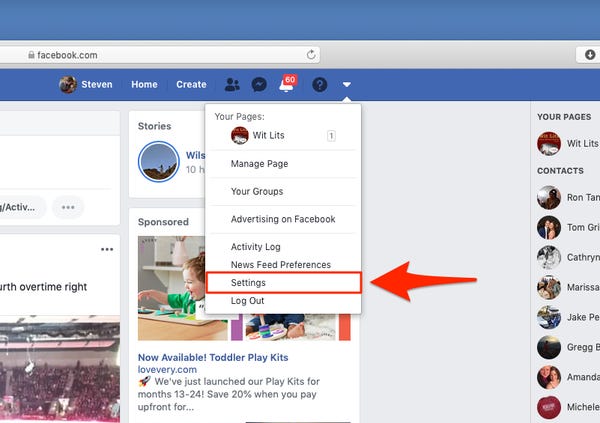 Facebook is the largest social media network that allows users to form a virtual connection with their family, friends, colleagues, and others. With attractive features including sharing photos and videos, Facebook polls, adjustable privacy settings, likes and shares, Facebook live, a news feed, and much more, Facebook rapidly gained popularity. Due to its sheer interactive nature, it causes the users to engage on this network for hours. Moreover, it enables users to make necessary modifications to their profile; users can also change Facebook page name or profile. You can find the steps on how to change your name on Facebook: page name and profile name in this blog. You can make these changes using your desktop or computer.
STEPS TO CHANGE FACEBOOK PAGE NAME ON DESKTOP The process of changing your Facebook page name is relatively simple, provided the steps or instructions. On the contrary, it may seem a little tricky if users aren’t aware of the process. To change Facebook page name, please implement the following steps. ● Login to your Facebook account on browser and find your business page under the page management link ● Click on the three ellipses next to the like, follow, and share options, and select Edit page info ● Scroll down the page to click on See All Information ● Then, click on Edit next to your name and enter the new name ● Click on Review your request followed by a click on Request change Please be patient till Facebook approves your name change request. Your new name shall appear as soon as Facebook approves your request. STEPS TO CHANGE FACEBOOK PROFILE NAME To change name on Facebook profile, please implement the following steps. ● Open the browser on your desktop and insert Facebook.com in the URL and press Enter to launch the page ● Locate a downward arrow at the top-right corner of your screen and click on it to reveal a drop-down menu ● Click on Settings & Privacy, then click on Settings ● Click on General from the left column to open General settings on the right side of the page ● The first option on the right is Name; click on the Edit option next to it ● Change your name as per your reference and click on Review Change ● Lastly, click on Save changes Using the steps on how to change your name on Facebook mentioned in this blog, you can change your Facebook profile name and your business page name easily. Please make sure to follow the Facebook guidelines while deciding on a new name for Facebook. For more information, please visit our other blogs.  Indeed, SBCGlobal like other popular email services has earned a prominent name in the ‘Email Communication’ world for providing phenomenal emailing experience to all its 4 million worldwide users. They love using SBCGlobal on various devices for easily exchanging emails with both their loved ones and professional colleagues.
However, generally, SBCGlobal works efficiently on every device be it a tablet, laptop, mobile phone or computer but, sometimes the case is quite the contrary. Well, it has been recently noticed that many SBC Global users have reported that their SBCGlobal email account is not working on their iPhone. So, if you’re also one of those SBCGlobal users who’re facing “SBCGlobal Email Not Working on iPhone” issue after the configuration of the same then, worry not! This is a very common scenario, noticeable every now and then among many SBCGlobal users who’ve configured their respective SBCGlobal email account on iPhone. Wondering why? Then, for your understanding we’ve listed the following six factors why SBCGlobal may not be working on your iPhone – List of Reasons Why SBCGlobal Email Is Not Working on iPhone
Top 8 Solutions to Resolve “SBCGlobal Email Not Working on iPhone” IssueSolution 1: Restart Your iPhoneFirst and foremost, whenever you face such ‘SBCGlobal email not working on iPhone’ issue, you must force restart your iPhone as this tried and tested simple work-around resolves the same in most cases. So, you can also try this solution and for that perform these steps--
Solution 2: Check Your iPhone’s iOS System and Update It With the simple logic that if your iOS system itself is malfunctioning or obsolete then, how any application or email service works effectively on the same! Therefore, if this is the case with you, make sure to repair the system using the “iMyFone Fixppo” tool (recommended by various media sites). This tool will go into your iOS system and fix all system errors. And, as you finish repairing your iPhone’s iOS system, it is further mandatory to update the same with the latest version via— ‘Settings > General > Software Update > Download > Install.’ This will ensure the smooth functioning of all the applications and services that are running on your iPhone device. To be precise, doing so can also resolve the ‘SBCGlobal Email Is Not working’ issue that you’ve encountered on your iPhone. Solution 3: Ensure Connecting With Proper Network ConnectionTo run an email account on any device, proper network connection is a must, isn’t it! So, if the same is not working properly then, you can consider it as a possibility that your SBCGlobal email account may not be able to use enough cellular network of your iPhone. Therefore, checking the network issue and connecting your device with a strong and proper internet connection should be on your priority list. And, to do the same, here are the steps that you need to perform--
Solution 4: Check Server Status of SBCGlobal Email ServiceIf the SBCGlobal email service is encountering network outage issues then, you’re bound to face ‘SBCGlobal not working’ issue where you “Can’t Send Sbcglobal Emails from iPhone” and vice versa. So, you’ve to ensure whether the server of your SBCGlobal Email Service is down or not. To check about the same, consider visiting websites like ‘Outage report,’ ‘Downdetector.in,’ and ‘Isitdownforeveryoneorjustme’ from your Safari browser. From any of these sites, you’ll get to know the actual status server of SBCGlobal email. And, once you get to know the same, it further leads to the following three possibilities--
Solution 6: Clear Some Space for SBCGlobal Emails If your iPhone device left with less or no space due to the accumulation of cookies and caches of all the apps available on it then, this might be the reason why your ‘SBCGlobal email is not working’ and also why you can’t access SBCGlobal email on your iPhone. However, simply by reducing the data processing and fetching after removing the unwanted offload apps data, you can clear up some space on your iPhone to improve and enhance the performance of all the available apps. So, considering the same, try to get rid of the issue of ‘SBCGlobal is not working on iOS’ by freeing up some space for SBCGlobal emails through these following steps--
Solution 7: Check SBCGlobal Email Server Settings for iPhoneIt might be possible that you’ve configured your SBCGlobal email account on your iPhone with incorrect SBCGlobal server settings. Thus, considering this as a possible cause behind why your SBCGlobal email account is not effectively working after configuration, ensure whether you’ve configured it with correct server settings of SBCGlobal email service for iPhone. And, simply for that, you’ve to match the POP3/IMAP and SMTP server settings of your SBCGlobal email that you’ve entered with the following correct SBCGlobal Email Server Settings for iPhone. However, as recommended by many you must ensure the type of ‘Server Account.’ If the same is displaying ‘POP3’ then, consider replacing it with ‘IMAP’ and be extra precise in entering the server settings of the same. Well, it is so because IMAP as compared to POP3 is a newer and more advanced protocol version. And, the same makes it a lot easier to sync your SBCGlobal emails on your iPhone devices. Solution 8: Remove and Re-configure SBCGlobal on iPhoneLast but not least, if none of the above-given solution works in your favor to resolve the encountered ‘SBCGlobal not working on iPhone’ issue then, no matter what’s the actual cause behind the occurrence of this particular issue; consider resolving the same by first removing your SBCGlobal email account from your iPhone via these steps-- Remove SBCGlobal Email Account from iPhone
That’s all! Hopefully, the troubleshooting solutions that we’ve discussed here will help you access your SBCGlobal email account on your iPhone device, that too without encountering any further inconvenience. However, if anyhow you still face a similar issue with your account then, you can also consider configuring SBCGlobal account on MS Outlook email client program. Source: https://emailspedia.com/sbcglobal-email-not-working-on-iphone/  ave you configured your Bellsouth email account on your iPhone with having two motives in mind i.e., to avoid Bellsouth webmail issues (especially related to log in) and to get access to your Bellsouth emails on one click but, instead of what you have thought, if your Bellsouth email is not working at all in your iPhone then, this is the guide that you all need right now to fix the same with the blink of an eye!
So, if you’re wondering why my Bellsouth email is not working on my iPhone then, let us tell you that the reason behind the occurrence of ‘not working error’ in your Bellsouth email is either due to the issue with your Apple device or with your Bellsouth account. Thus, considering the same fact in mind, we’ve come out with this blog to present an effective guide in front of you that not only enlightens you about how to deal with your Apple device issues but at the same time how you can deal with your Bellsouth account issues as well. So, without wasting any further second, let’s get started to troubleshoot both of them-- List of Reasons for Apple Device IssuesIf the problem is with your Apple device then, these are the list of reasons that might be hampering the working of Bellsouth email service:
Troubleshoot Apple Device IssuesSolution for Reason 1: Update iOS SystemTo update your iPhone system what you need to do is navigate from the ‘Settings’ option and ‘General Tab’ to ‘Software Update’ section. Inside it, simply tap on the ‘Download and Install’ option to update your iPhone with the latest version. However, if you suspect that your system is malfunctioning then, before applying the above-listed steps, repair all your system’s errors by using this recommended tool ‘iMyFone Fix Ppo.’ Solution for Reason 2: Enable Cellular NetworkIt is necessary to let your Bellsouth Mail use the cellular network of your iPhone because you never know when your Wi-Fi disconnects from your phone. Thus, enable cellular network data-access for your Bellsouth Mail via ‘Settings > Cellular > Mail.’ Inside the ‘Mail Tab’ check if the slider is turned to green or not and if not, then enable the same to avoid issues of lost internet connectivity. Solution for Reason 3: Disable/Uninstall Third-Party Apps (if any)First and foremost disable any third-party available program/ application on your iPhone for the time being that might be blocking or interfering with your Bellsouth email and then, with the help of an antivirus application, simply get the malware and virus removed (if any) from your iOS system. Solution for Reason 4: Fee-up Some SpaceTo clear up some space on your iPhone, you need to remove the unwanted cache via ‘Settings > General Tab > iPhone Storage.’ Inside the iPhone storage tab, scroll down to the list of apps available on your iPhone and tap on ‘Mail App’ along with ‘Offload App’ to finally clear these apps’ caches. Solution for Reason 5: Remove and Re-add Bellsouth Email AccountSimply, remove and re-add the account via ‘Settings > Mail, Calendar & Contacts > Accounts > List of Accounts.’ From the list of accounts, tap on Bellsouth account, choose the ‘Remove’ button, and then add the account again. To do so, tap on the ‘Add Mail Account’ option from ‘Accounts’ option and just enter the details associated with your Bellsouth email account. (Precisely with the same steps that you used earlier.) Troubleshoot Bellsouth Account IssuesSolution for Reason 1: Enter Password CarefullyIt might be possible that, in a hurry you’ve entered the password of your Bellsouth email account incorrectly. Therefore, take it as a recommendation that you should type your password slowly and steadily along with taking extra care of the ‘Upper and lowercase letters’ as all passwords are case-sensitive. Also avoid copy-pasting your password because it ‘Space’ also gets copied in the beginning and in the end of your actual password. Solution for Reason 2 & 3: Reset Bellsouth Account PasswordNo matter if you have forgotten your password or someone has hacked your account and changed it, you can apply the following steps in both cases--
To be precise, if you can access your Bellsouth email account without any error then, there’s no server issue and if you received ‘500-error’ then, it is clear that Bellsouth server is down. Solution for Reason 5: Check the Bellsouth Email Configuration SettingsFor the proper working of Bellsouth email on iPhone, cross-check the configuration settings that you’ve entered with the following below-given correct settings and if required navigate from ‘Settings > Mail Menu > Accounts > Bellsouth Email Account > Account Information’ to change the ‘recent 2019 Bellsouth email settings for iPhone’ accordingly-- Bellsouth IMAP Settings for iPhone Incoming Mail Server Settings Outgoing Mail Server Settings Incoming Server Host Name: imap.mail.att.net Outgoing Mail Server Host Name: smtp.mail.att.net Incoming Mail server port: 993 Outgoing Mail server port: 465 Use SSL: YesUse SSL: Yes Bellsouth POP Settings for iPhone Incoming Mail Server Settings Outgoing Mail Server Settings Incoming Server Host Name: pop.mail.att.net Outgoing Mail Server Host Name: smtp.mail.att.net Incoming Mail server port: 995 Outgoing Mail server port: 465 Use SSL: YesUse SSL: Yes That’s all! We hope that the above-mentioned solutions will help you get rid of the ‘Bellsouth.net email not working on iPhone’ issue completely. Original Source: https://emailspedia.com/bellsouth-email-not-working-on-iphone/  The e-mail program Outlook is used by many companies and private individuals to help organize messages and appointments in an Outlook calendar. Outlook’s search function is indispensable to people who receive and answer many e-mails daily. The advantage is that you do not have to search through all folders, but instead can view a filtered section of relevant messages by entering a search term.
What kind of folders or time you want to filter can be set up with just a few clicks before hitting search. This makes it easier for both private and business users to communicate faster and to structure their messages very clearly. But what if the Outlook search function suddenly stops working? What problems may occur when there are no matches found? How can they be eliminated? The Outlook search function no longer works: typical problems Not all Outlook search issues are made equal. If your Outlook search function is not working, there may be different causes for it. What may cause one user to no longer be able to see search results, may cause another user to only see half the available e-mails in their search. Typical problems with the search function include:
Restarting Outlook Sometimes the simplest solutions are the most effective. Restart the program by closing it entirely once and then reopening. But be careful: Outlook may be set up by default so that clicking close does not mean exiting the program. It continues to run in the background and is simply no longer directly visible to you. You can find out whether this is the case in your system tray. If the Outlook icon is still active there, it means you have not closed the program. Look at the visible and hidden icons. To exit Outlook permanently, just right-click the icon and select “Exit.” Alternatively, select “File” and “Exit” in the Outlook menu. Closing the program using Task Manager If Outlook does not respond to your attempts to close it, you can also force this through the Task Manager. To do this, end the “OUTLOOK.EXE” process. Follow these simple steps:
It may also be helpful to restrict your search to just a specific folder, e.g. “Sent Messages” or one of the subfolders in your inbox. If the Outlook search function is still not working, you can restart your PC. Using the repair function If a restart does not solve the problem, you can then try to repair the program virtually. Just go to the Window control panel and select the “Programs” category. You now have the option to uninstall or modify the program. Usually you select your entire Microsoft Office package to be repaired, since Outlook is a part of that package. Click on “Change” and then “Repair.” When the repair is complete, close the window and restart Windows. If the cause of the problem lies in the repair tools’ access area, the Outlook search function should return to normal. Repair Outlook from the control panel. Check Outlook for updates Make sure that your Outlook program is up to date. The updates are done centrally through the Windows update. Outdated versions of the program may no longer be compatible with the latest updates that your Windows operating system has already been running in the background, so it’s important that you always keep your Outlook up to date. To decipher whether this is the case, check for available updates. You can do this in the “Settings” section with Windows 10. Select the “Update and Security” section. Click on “Advanced Options” and “Install updates for other Microsoft products.” Then go back to the previous page and start running a check for new updates by clicking on “Check for updates.” If none are available, you can ignore this step. Disable third-party search tools Some third parties have developed add-ons that can be integrated into the Outlook program. These may create problems for Outlook’s search function. Extensions can also access the program’s database, so that users can search for messages through them. To resolve this inconsistency, you should disable any third-party tools that you install later. If the add-on was the reason for the Outlook search function not working, it should now work. Checking Outlook indexingOutlook has an index that is structured like a data catalogue. It combines all important terms in saved e-mails. This allows users to find specific messages just by entering a search term. If the Outlook’s search engine is no longer working, it is often because the program settings are incorrect and because the necessary information has not been collected. To find out whether this is the case for you, you need to check the indexing options. To do this, proceed as follows:
If you suspect that one of these files has become corrupted, you will need a tool to repair your inbox. Outlook has already integrated the scanpst.exe tool. It detects whether a PST file is damaged and then repairs it. The following steps will help you repair a PST file:
There are sometimes errors or incorrect information in the registry, resulting in certain programs now starting or working correctly. If your Outlook search function is returning no matches found, it may be due to incorrect registry information. If you are unable to perform an Outlook search after you have already reset the index, you have the option of forcing a “clean up” through the registry. ! Note It is recommended that only administrators or experienced computer users make changes to the registry, since cleaning the registry automatically resets Outlook. Incorrect entries can cause more problems with PC software. It is also advisable to make a backup copy before making any changes to the registry. Resetting Outlook manually is the final resort before reinstalling the program. To delete registry entries for your Outlook program, open the registry first:
Reinstalling Outlook When uninstalling the program, proceed like you are repairing it. To remove the program, open Control Panel, select “Program” and then “Uninstall program.” Then select “Add or Remove Features” in the “Microsoft Office” entry and confirm the action with “Next.” You will then see a list of individual associated programs. Click on the small arrow next to “Microsoft Outlook” and set it to “Not Available.” Confirm your selection with “Next” and follow any further instructions from the (un)install wizard. When the uninstallation is complete, close the window and restart the computer. Original Source: https://www.ionos.com/digitalguide/e-mail/technical-matters/outlook-search-function-not-working/ Gmail, also known as Google Mail, is one of the leading email services today. As it is a recognized product of Google, it earns reliability and trust quite naturally. Being the top internet-related service provider, Google is remarkably concerned with its product’s functionality, which is why all Google products are excellent to utilize. Despite Gmail being the top email service and Google’s concern with smooth functionality, users often experience issues with Gmail. Some of the common problems include Gmail not working. Since Gmail is accessible across different operating systems, namely, Android, iPhone, Windows, and Mac. We will discuss the solutions for the problem restricting to iPhone.
STEPS TO TROUBLESHOOT GMAIL NOT WORKING ON IPHONE If you are an iPhone user, you would already know how strict iOS is when it comes to any external data, program, or software. Oftentimes, such problems occur due to the fastened security measures of the iPhone. Security plays a significant role in the occurrence of the issues like Gmail not working on iPhone. Nevertheless, you can quickly solve such problems. Please find the steps for the same below. SOLUTION: CHECK IMAP SETTINGS IMAP, an abbreviation of Instant Message Access Protocol, is the protocol that Gmail uses to retrieve emails from a mail server. To make Gmail work again on your iPhone, you need to check and ensure that IMAP is enabled on your account. Once you allow IMAP, Gmail not working on iPhone should resolve. To enable IMAP on your Gmail account on your iPhone, you may need to remove your Gmail account from your device. Remove account:
Add account with IMAP enabled
After you finish making all changes, restart your Gmail application and check if the Gmail not working issue is resolved. If you need more information regarding Gmail or any other email service, you can visit our other blogs.  Google Chrome is one of the leading web browsers today as it is a Google product and considered highly reliable. Chrome has multiple features like bookmarks, extensions, task managers, browser history, and more. This web browser also lets you change your font settings for a more personalized look. You can change the font settings by increasing or decreasing the font size as per your convenience and change the font style. You will learn about chrome font settings in this blog. You will find the instructions to change font size and the font style in this blog. Also note, you can go back to the default settings anytime you wish to.
STEPS TO CHANGE FONT SETTINGS ON GOOGLE CHROME If you wish to know how to change font in Google chrome, you have come to the right place. Below are the instructions to make all the changes you require to modify font settings.
The steps above explain how to change font in Google Chrome. You can make it as personalized as you wish to because Google gives you the option. However, you can download the advanced settings extension for more modifications or alternatives in Font styles. Let’s find out more about the advanced settings. CHROME ADVANCED SETTINGS The Advanced font settings is a free browser extension that offers you more control over fonts on websites. You can add it to Google Chrome for more modification or change in the fonts. You can easily download it from the Chrome web store. Its main features include custom font settings per script and the options to change the default font size for fixed-width fonts. This blog provides you the instructions to change font size and font style on Google chrome for a more personalized touch. Additionally, this blog also informs you about the advanced font settings extension that is easy to use and offers more control over the fonts. If you need more information about related topics, you can visit our other blogs.  Xerox Phaser 3260 is a personal monochrome laser printer that offers a 250 sheets paper tray and two side printing. Xerox Phaser 3260 doesn’t come with an Ethernet connection, and it means you can’t connect it directly with the wired network. However, it supports the Wi-Fi connection to the access point.
Features of Xerox Phaser 3260 Xerox Phaser 3260 can print around 29 pages per minute in the simplex mode, but when you install the Xerox Phaser 3260 driver, it shifts to the duplex mode by default. Xerox Phaser 3260 produces the text prints that are best in accordance with the business requirement. Graphical output is the best for a monochrome laser. With this, Xerox Phaser 3260 perfectly supports mobile printing. However, it is restricted to printing through the cloud and Apple AirPrint. When you connect the printer to the network, then you can easily print it from the IOS smartphone and an Apple computer that backs the Airprint through a Wi-Fi access point; if you want to connect PC with the USB cable, then you can’t print through the cloud, but you can utilize it with the Wi-Fi direct printer support to print using Airprint. Step by Step Guide to Install Xerox Phaser 3260 Driver Xerox Phaser 3260 printer comes along with the Xerox Phaser 3260 manual, you can check out the manual, and according to the given instructions, you can follow the steps. But, if you don’t have a manual, check out the steps given below.
If you have any query like Xerox Phaser 3260 red light blinking or anything else, you can either go to their official website or check out the manual to get the solution of your query. |
Author'Alice Cook' is been working for the last 5 years as the strategists and senior digital leader with a core skill set in digital marketing, digital transformation. Work at Contactforhelp. Archives
June 2021
Categories
All
|
 RSS Feed
